
Scheduler
Scheduler Settings
The Scheduler Settings tab allows you to configure scheduled updates and
scans. This feature is only available in the PRO version of Malwarebytes
Anti-Malware and is available after the product has been activated with a valid
ID and Key. You'll also get to try this feature if you use the free trial,
however it will cease to function once your trial expires.
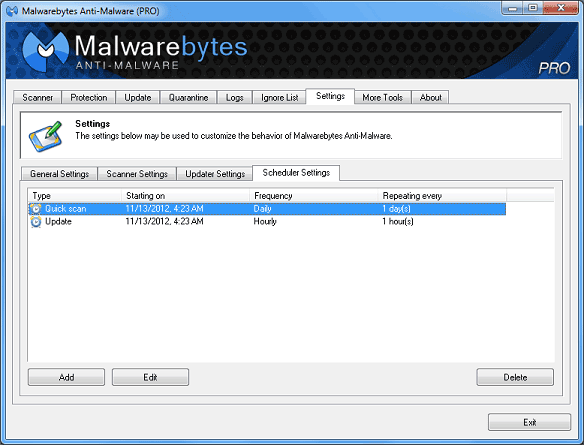
You may click an existing scheduled item and use the Edit button to
modify the scheduled task or the Delete button to remove it. Clicking
the Add button allows you to create a new scheduled task as shown below.
Use the radio buttons next to Type: to select what type of scheduled
task you wish to create (Scan or Update).
Scheduling a scan
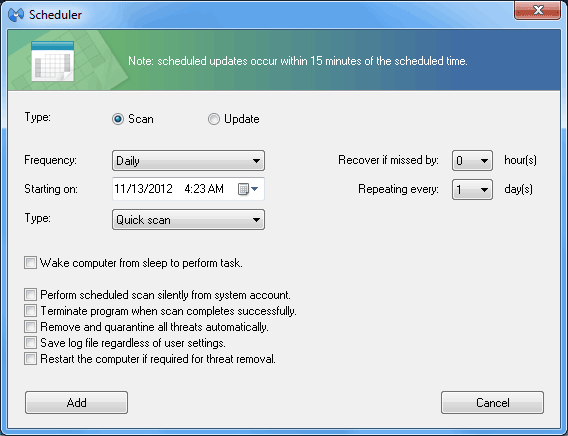
- Frequency:This is where you select how often you want
your scheduled scan to occur. Available options are
Hourly, Daily, Weekly,
Monthly, Once, and On
reboot.
- Starting on:This is where you choose the date and time
that the scheduled scan should run for the first time. You may click in the
box itself to change the date or time and you may also change the date by
clicking on the small calendar icon on the right side of the box.
- Recover if missed by: This is set to 0 by default, but
if set to any other number (1-23), the task will attempt to run if the
scheduled time was missed because the system was turned off during the
actual scheduled time and the system is running within the number of hours
that 'Recover if missed by' is set to. For example, if you have a daily
scan set to run at 12:00AM, but your computer was not running at 12:00AM
and you have 'Recover if missed by' set to 8 hours, if your PC is running
any time between 12:00AM and 8:00AM, the scheduled scan will execute. This
option is unavailable for monthly and on reboot scans.
- Repeating every: This is where you select how often the
scheduled scan repeats. Available options are 1-23 hours
for hourly scans, 1-60 days for daily scans, and
1-8 weeks for weekly scans. This option is unavailable for
scans set to run on reboot.
- Wake computer from sleep to perform task: This option
will have Malwarebytes Anti-Malware attempt to wake your computer from
sleep mode to execute the scheduled scan. Unfortunately this does not work
on all system configurations. This option is unavailable for scans set to
run on reboot.
- Perform scheduled scan silently from system account:
This will have Malwarebytes Anti-Malware run the scan from the hidden
SYSTEM user account, resulting in the scan running in the background
without the scanner window showing. Upon completion of the scan, regardless
of whether or not threats were found, the scan will terminate.
- Terminate program when scan completes successfully: This
will have Malwarebytes Anti-Malware close if no threats were detected. This
checkbox is automatically selected and cannot be unchecked if you have also
enabled the 'Perform scheduled scan silently from system account' option.
- Remove and quarantine all threats automatically: This
will have Malwarebytes Anti-Malware remove any detected threats. Note that
it also honors your scanner settings for PUP, PUM and P2P objects, so if
any or all are not set to be selected for removal, they will not be
removed.
- Save log file regardless of user settings: This will
have Malwarebytes Anti-Malware save a logfile upon completion of the scan
even if 'Automatically save log file after scan completes' is unchecked
under your general settings.
- Restart the computer if required for threat removal:
This will have Malwarebytes Anti-Malware reboot your computer without any
notice should a threat be detected and removed during your scheduled scan
which requires a reboot to complete the removal process.
Note: You will not have the opportunity to save anything
you are working on when this restart occurs so any open files in other
programs will not be saved.
- Add: Once you have your scan configured the way you want
it, click the Add button to add it to the scheduler.
- Cancel: If you've decided not to add your scheduled scan
after all or not to make any changes to the one you were editing, click
Cancel and no changes will be made and no new scheduled scan will be added.
Scheduling an update
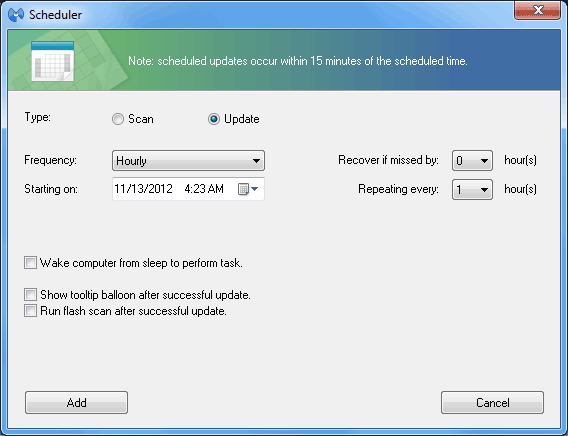
- Frequency: This is where you select how often you want
your scheduled check for updates to occur. Available options are
Realtime, Hourly,
Weekly, Monthly, Once,
and On reboot.
- Starting on: This is where you choose the date and time
that the scheduled update should run for the first time. You may click in
the box itself to change the date or time and you may also change the date
by clicking on the small calendar icon on the right side of the box.
- Recover if missed by: This is set to 0 by default, but
if set to any other number (1-23), the task will attempt to run if the
scheduled time was missed because the system was turned off during the
actual scheduled time and the system is running within the number of hours
that 'Recover if missed by' is set to. For example, if you have a daily
update set to run at 12:00AM, but your computer was not running at 12:00AM
and you have 'Recover if missed by' set to 8 hours, if your PC is running
any time between 12:00AM and 8:00AM, the scheduled update will execute.
This option is unavailable for monthly and on reboot updates.
- Repeating every: This is where you select how often the
scheduled update check repeats. Available options are 1-59
minutes for realtime updates, 1-23 hours for hourly
updates, 1-60 days for daily updates, and 1-8
weeks for weekly updates. This option is unavailable for all other
frequencies.
- Wake computer from sleep to perform task: This option
will have Malwarebytes Anti-Malware attempt to wake your computer from
sleep mode to execute the scheduled update. Unfortunately this does not
work on all system configurations. This option is unavailable for updates
set to run realtime or on reboot.
- Show tooltip balloon after successful update: This
option will have Malwarebytes Anti-Malware's tray icon used for realtime
protection notify you when a successful update has occurred, but only if
the database was actually updated. In order to receive this notification,
Malwarebytes Anti-Malware's protection module must be running, however it
does not require that either component of the protection module be
enabled.
- Run flash scan after successful update: This will have
Malwarebytes Anti-Malware run a flash scan to check your system for any
active threats which might reside on your system. It's useful for verifying
that you aren't infected with anything which was not detected in the
previous database but is now detected in the one which was just downloaded
by the updater. This scan cannot be set to run silently.
- Add: Once you have your update configured the way you
want it, click the Add button to add it to the scheduler.
- Cancel: If you've decided not to add your scheduled
update after all or not to make any changes to the one you were editing,
click Cancel and no changes will be made and no new scheduled update will
be added.